

Acoustic Plaster Installation
Acoustic Plaster Installation Guide
Introduction
Acoustic plaster is an innovative solution that enhances the aesthetic appeal of interior spaces while providing excellent sound absorption. This guide outlines the essential steps for installing acoustic plaster, ensuring a smooth and effective application.
Requirements for Installation
1. Plasterboard Substrate
Before the installation of acoustic plaster begins, it is crucial to prepare a suitable substrate. A plasterboard substrate is required to provide a solid and even base for the acoustic plaster application. Ensure that the plasterboard is securely fixed and free from any imperfections. The Joints must be taped and filled.
2. Sealing Ceiling Apertures
To achieve optimal acoustic performance, all ceiling apertures must be sealed. This step prevents dirty air from being drawn through any gaps, which can compromise the effectiveness of the acoustic plaster and look unsightly after a few months. Use appropriate sealing materials to ensure a tight seal around all openings.
3. Priming Painted Ceilings
If you are applying acoustic plaster over painted ceilings, it is essential to prime the surface beforehand. Priming enhances the adhesion of the acoustic plaster, ensuring a smooth and durable finish. Choose a high-quality primer suitable for the specific paint type used.
4. Full Deck System Application
We utilise a full deck system to carry out the plaster works. This method guarantees an even application of acoustic plaster across the entire surface, promoting consistent sound absorption and aesthetic quality. Our experienced team will ensure meticulous attention to detail during the installation process.
5. Special Installations for Swimming Pool Ceilings
For swimming pool ceilings, special installation techniques are required to withstand the unique environment. We utilise concrete-style boards and concrete-style adhesive for these applications. This ensures durability and moisture resistance, making it ideal for humid areas. Let us help you achieve a beautiful and functional acoustic solution for your pool area.
6. Curved Ceilings
Our acoustic plaster system is also suitable for curved surfaces, allowing for creative design possibilities. We can apply our acoustic plaster to curved ceilings with a tight radius as small as 500mm. This flexibility enables architects and designers to explore innovative shapes while maintaining acoustic performance.
7. Colour Matching
One of the most significant advantages of our acoustic plaster installation is our ability to match most colours. Whether you have a specific colour in mind or need assistance in choosing the perfect shade, we are here to help achieve your design vision without compromising on acoustic performance.
Our Guide to Installing Acoustic Plaster System
Cutting Acoustic Panel
To install a Baswa acoustic panel on the ceiling, start by measuring the area where the panel will be placed to ensure a proper fit. Carefully the dimensions on the panel and use a suitable cutting tool, such a utility knife or saw, to cut the panel to size. Once cut, prepare the ceiling surface by cleaning it and applying the recommended adhesive for optimal adhesion. Finally, press the panel firmly into place, ensuring it aligns correctly with the surrounding panels for a seamless finish.

Gluing Acoustic Panel to ceiling
To glue the acoustic Baswa panel to the ceiling, start by preparing the surface to ensure it clean and dry. Apply a suitable adhesive evenly on the back of the panel, following the manufacturer's instructions for optimal results. Carefully position the panel against the ceiling, ensuring it is aligned correctly before pressing it firmly into place. Allow adhesive to cure as recommended, ensuring a secure and effective installation that sound absorption in your space.

Filling Acoustic Panel Joints
To fill the joints between the Baswa acoustic panel joints prior to plastering, start by mixing the filler with water according to the manufacturer's instructions. Once the mixture reaches a smooth, workable consistency, apply it carefully into the gaps between the panels. Use a trowel to ensure the filler is evenly distributed, creating a finish that integrates well with the surrounding surfaces. Allow the filler to dry completely (around 36 hours) before proceeding with the sanding process for optimal results.

Sanding the Acoustic Panel
Quiet Interiors use air-assisted masks during the sanding of BASWA panels to ensure a flat surface is achieved, ready for plastering. This innovative approach not only enhances the efficiency of the sanding process but also protects our team from dust and particles, a safer work environment. By utilising air-assisted technology, we can maintain high standards of quality while minimising airborne contaminants, resulting in a smoother finish
Applying the Acoustic Plaster
Quiet Interiors expertly applies Baswa acoustic plaster using either a 3mm trowel or a Baswa jet spray machine. The process begins with gauging the plaster using the notched trowel, ensuring an eveness across the surface. While the plaster is still wet, it is carefully smoothed off to create a seamless finish, enhancing both the aesthetic and acoustic properties of the space. This meticulous application technique contributes to a serene, reducing noise levels for a more comfortable atmosphere.

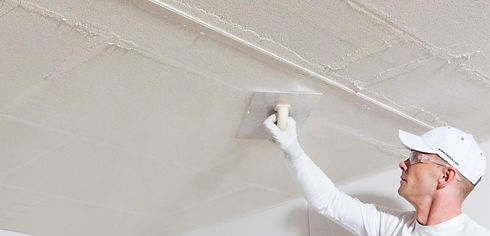
Acoustic Plaster Smoothing
Quiet spaces are achieved through the meticulous work of dedicated craftsmen who expertly trowel smooth acoustic plaster for an impeccable finish. Utilising flexible type trowels, these skilled artisans ensure that every ceiling is refined to perfection, enhancing both the aesthetic appeal and acoustic performance of the space. Their attention to detail and commitment to quality craftsmanship result in environments that not only look stunning but also provide the tranquility needed in any setting. The combination of their expertise and the right tools creates an ultimate finish that elevates the overall ambiance
